We are proud to announce that we have added a new RSVP feature. It is available only to our Invitation designs.
Please note: RSVP Event Central is not available for Smilebox Pro users at this time
In this article, we will be addressing the following RSVP features (please refer the corresponding section for details):
1) Find and send an invitation with RSVP
2) View RSVP responses and comments
3) Add additional email addresses to the invite
4) Update event details
5) Turn comments ON or OFF
6) Make changes to the invitation and not just to the Event Central Page
7) RSVP to an invitation using Mobile or Tablet (Apple and/or Droid)
8) Sender's ability to click on “Yes” or “Maybe” or “No” when creation is sent to your own email address
9) How to RSVP to an invitation
10) Add a Comment
11) Will I be able to include names? How is the email displayed in the Event Central Page
12) Whom you've sent and who has viewed your invitation
13) Recipient not seeing the RSVP buttons “Yes” or “Maybe” or “No” (grayed out)
14) Save/retrieve a shared invitation
15) Save/retrieve the .jpg image of a creation after sharing
Details:
1) Find and Send an invitation with RSVP
In the “Home” tab when you “Browse by Format” you will see “Invitations” as shown below:

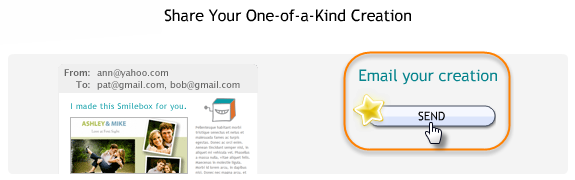
When ready to share, select “Share, Print or DVD” and click “Send” (see below).

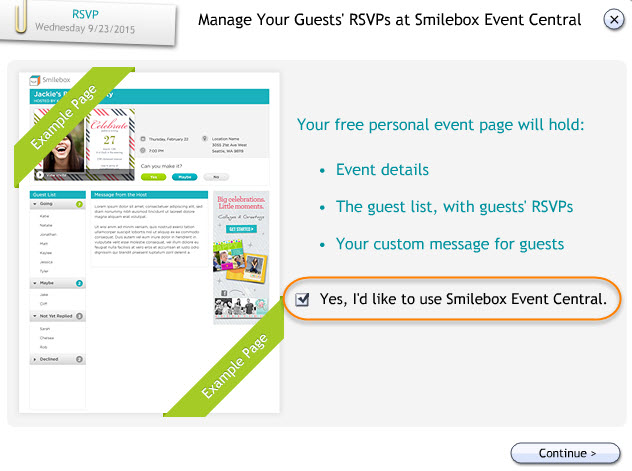
On the next screen, you will see the option to add an RSVP Event Central. To include it, check the “Yes, I would like to use Smilebox Event Central” box (shown below) and click on “Continue”.

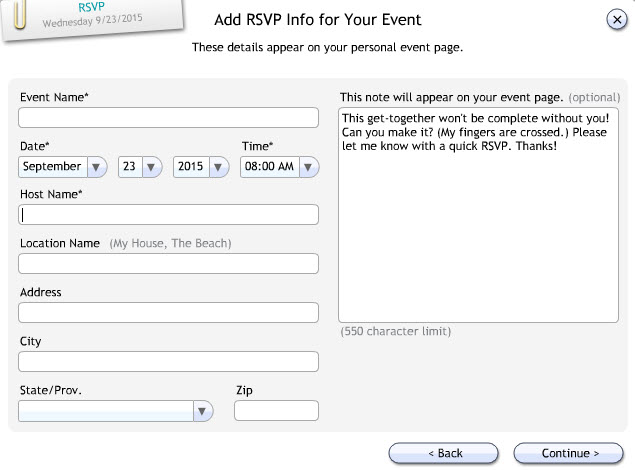
In the “Add RSVP Info for your Event” page (refer below) you can fill the following fields:
Event Name, Date, Host Name, Location Name, Address, City, State/Prov., Zip. You can either leave the default note or modify the message to meet your personal needs. Don’t forget to click “Continue” after entering the details.

On your next screen Send your Personalized Creation (refer below) you can enter your recipients' email addresses and other send information.
We do not recommend adding more than 200 recipients in one send.
To ensure the guests' name appears on the list, the following format must be shown in the "To" box:
"Guest 1" <email@address.com>, "Guest 2" <email@address.com>
This format is automatically applied if you are adding a recipient from your Address List with a Name added. If the email addresses are included only, the guest list will show only email addresses.
Please make sure to add a comma in between the email addresses. 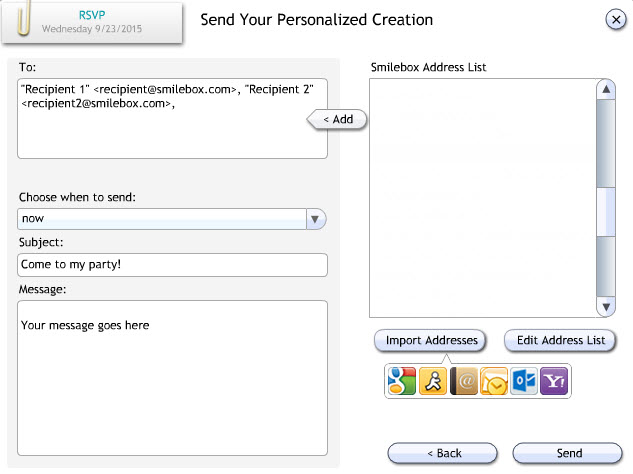 In order to perform the functions listed below, you need to open your “Event Central Page”.
2) View RSVP responses and comments
3) Add additional email addresses to the invite
4) Update Event details
5) Turn Comments ON or OFF
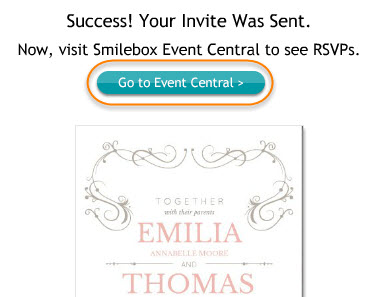
There are multiple ways to access your Event Central page.
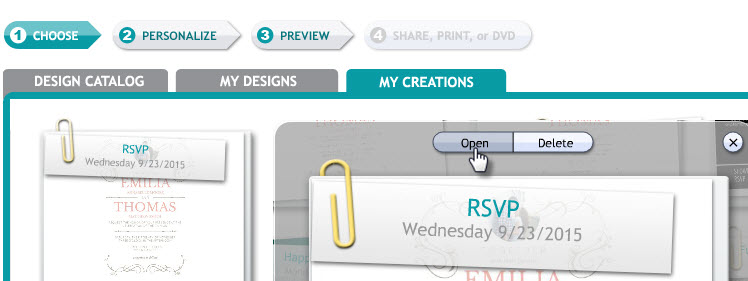
Open your creation from My Creations tab within the Smilebox program. Click Open (see below).

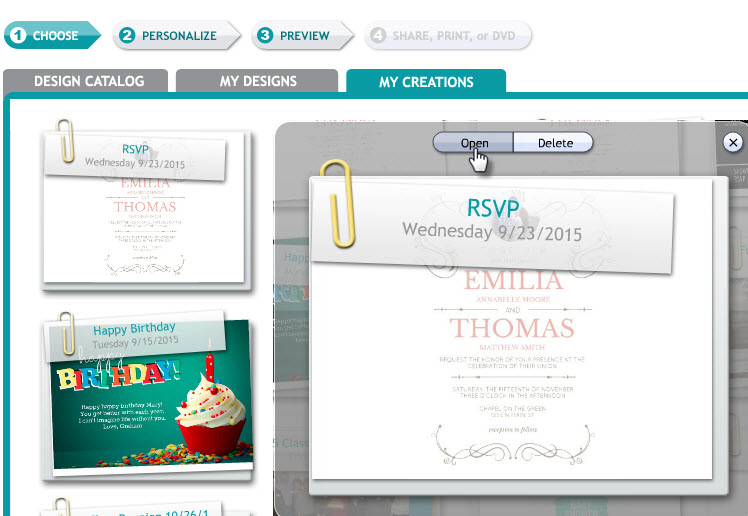
To see the RSVP response, click on “Go to Event Central >” (refer below)
OR
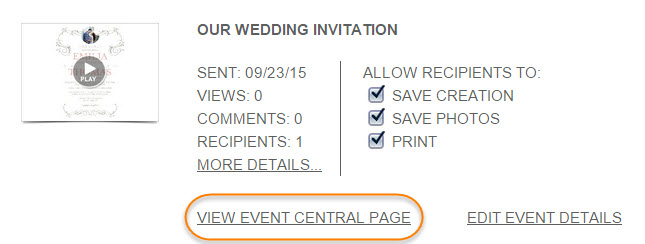
- Go to your Account Information page - http://my.smilebox.com; select View Event Central Page (below) or access the creation from your send confirmation email.
Playback the creation and click RSVP to access the Event Central Page.
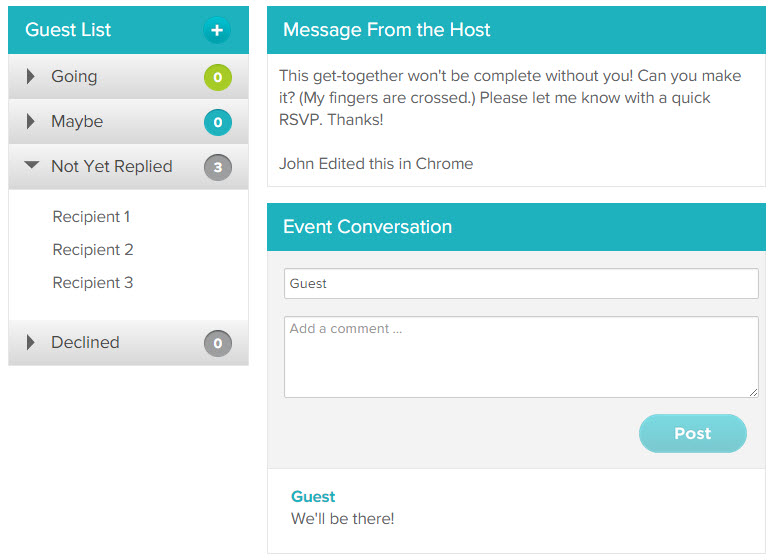
2) View RSVP responses and comments-
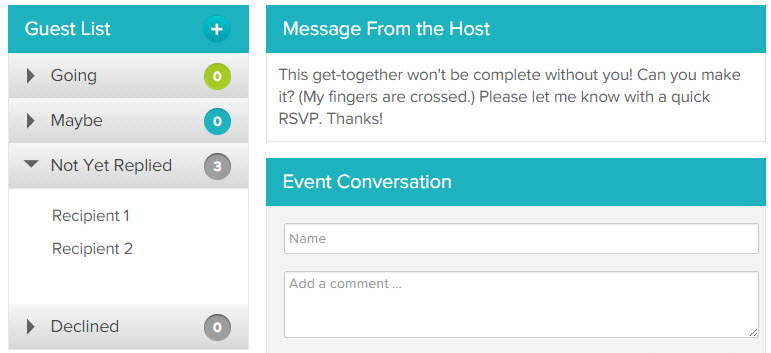
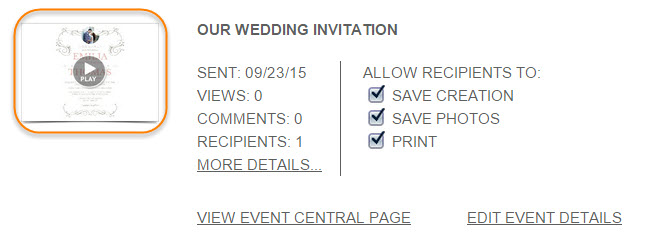
Once you open the Event Central Page, you will see any recipient responses and comments (refer below).

3) Add additional email addresses to the invite
Once you open the “Event Central Page”, select "Edit Event” in the top right-hand corner and click “Invite More Guests” in the drop-down list.

On your next “Invite More Guests” screen, add additional guest email addresses separated by a comma. Click on “Send” to complete your action.
Please Note:
- You can enter in a given time not more than 200 email addresses to the "TO" box.
- You will not have access to the Smilebox address book while entering the email addresses to the "TO" box, when you use our "Invite More Guests" feature.
- It is not possible in one click adding multiple email addresses to the “TO” box. If you have multiple email addresses stored in another application (example Excel or Notepad), using keyboard short cuts you can copy (Ctrl C) and paste (Ctrl V) it to the "TO" box. Please make sure to add a comma in between the email addresses.
4) Update Event details
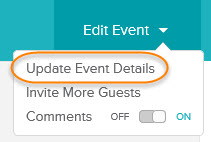
Once you open the “Event Central Page”, select “Update Event Details” (as shown below) from top right-hand corner “Edit Event” drop-down list.

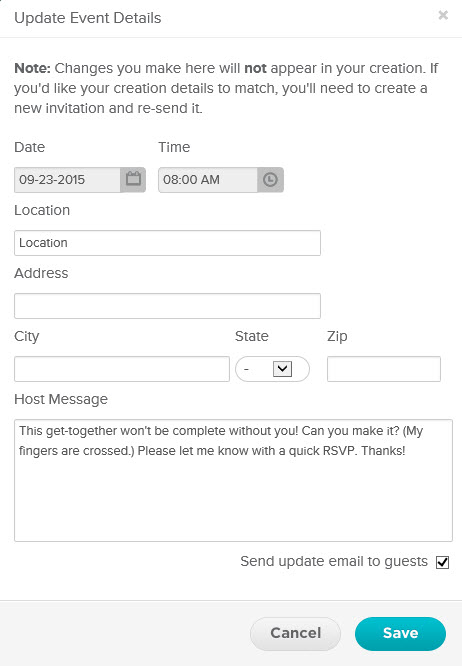
On the next screen you will see the following:
Date, Time, Location, Address, City, State, Zip and Host Message. Please remember to click Save so your changes are saved. This sends an update notice to your recipients.

5) Turn Comments ON/OFF
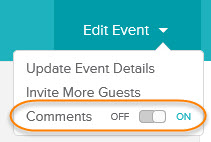
Once you open the Event Central Page, you will see Comments under Edit Event list (top right corner). By default, comments are ON, but if you want to turn it OFF, just click the toggle switch as shown below.

6) Make changes to the invitation and not just to the Event Central Page
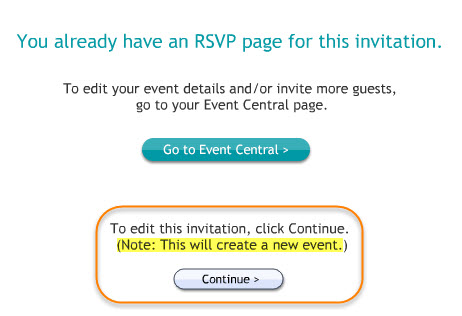
Once the creation has been sent, it cannot be edited. However, if you would like to make changes, you can send out a new Event Central page.
To do this, open your creation from the My Creations tab within Smilebox.

Select Continue > to make changes and create a new Event Central page. 
Please Note:
Any time you send a new creation, it will not transfer the responses from the previous one.
To locate the link, see our article: Find the creation link
7) RSVP to an invitation using Mobile or Tablet (Apple and/or Android)
When you receive an email invitation, open it or click on the link and RSVP your response by selecting the RSVP button (shown below).

8) Sender's ability to click on “Yes” or “Maybe” or “No” when creation is sent to your own email address
When you send the invitation to our own email address, the ability to click “Yes” or “Maybe” or “No” is possible only if you open the creation from the email you received.
Response buttons will NOT be active (greyed out) if you open the creation from “My Creations” tab or from My Account Page - http://my.smilebox.com
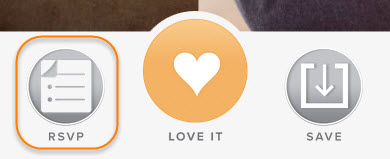
9) How to RSVP to an invitation
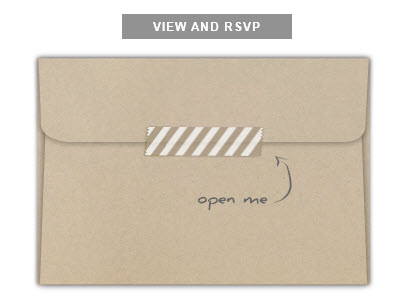
When you receive an invitation email you can either click on “CLICK TO OPEN INVITATION & RSVP” or the Envelop (refer below).
You can wait for the creation to finish playing to the end or not. Select “RSVP to This Event” (refer below) located at the right corner.

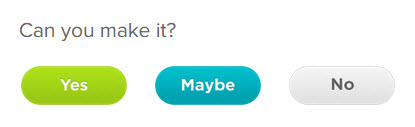
On your next screen, you have a choice to select Yes or Maybe or No.

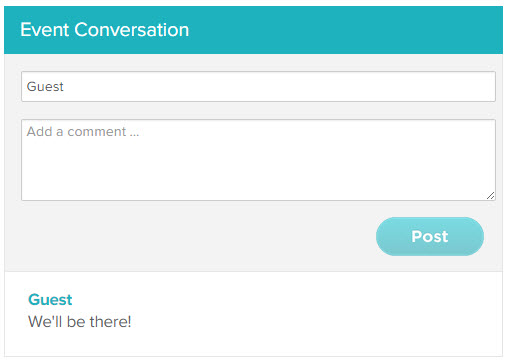
10) Add a Comment
You can easily add a comment to your invitation after sending the creation.

11) Will I be able to display names? How is the email displayed in the Event Central Page
There are two ways to ensure the name is displayed, rather than the email address. When first sending the invite, if a recipient is added from your Address List with their Name and Email entered, these will both be displayed.
If you are adding recipients after the fact, you can type the following format to make sure the name is displayed:
"Guest 1" <email@address.com>, "Guest 2" <email@address.com>
If the email address is formatted this way, the name will appear rather than only the email address (shown below).

Please note: Once the invite has been sent, it is not possible to edit or delete email addresses from the guest list.
12) Whom you've sent and who has viewed your invitation
If you want to know who you've sent and who has viewed your invitation, it works the same as any other Smilebox creation.
This feature will work only if you have shared your creation directly using Smilebox program (not forwarded your email confirmation copy or when you send your creation link).
Please refer to our article: How to check sent creation details (send date, recipients, views and more)
Please Note:
If you just wanted to know to whom you have sent the creation, you can also playback the shared creation from http://my.smilebox.com and view it in the Event Central Page. The names will show up on the left side.
13) Recipient not seeing the RSVP buttons “Yes” or “Maybe” or “No” (greyed out)
If the sender uses the Smilebox program to send you an invitation, then you will be able to see the RSVP buttons “Yes” or “Maybe” or “No”.
If the sender forward the "Confirmation Copy Email" of his creation or link to the Smilebox creation then buttons “Yes” or “Maybe” or “No will not work for you. It will be greyed out. The only choice you have is to make a comment. Please refer to our topic on Add a comment in this article.
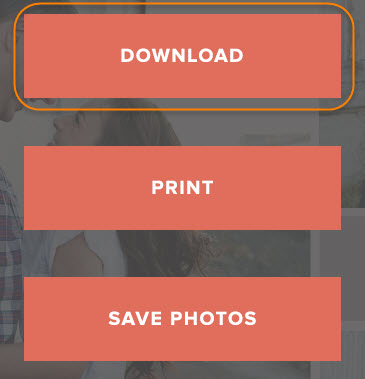
14) Save/download a shared invitation
This feature comes handy if you are changing computers or want to open/edit your Smilebox invitation on another computer. Playback your shared Smilebox invitation from http://my.smilebox.com under Share Activity (see below) or from the email confirmation copy you received in your inbox.

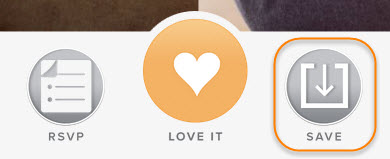
Click on "Save" (see below), then choose Download to begin downloading the creation.
You will need to close the Smilebox program before clicking the "Download" option.
It will save the creation under “My Creations” tab. You can edit, preview, or share the creation.
15) Save/retrieve the .jpg image of the creation after sharing
Playback the creation (from http://my.smilebox.com or from the Email Confirmation Copy), select “Save” (shown below).
You will see the following screen, where you have to click “Save Photos”.

Please note: Unlike regular creations, Smilebox creations with the RSVP feature do not have the quick "Download" feature in the Account page at http://my.smilebox.com.